Hello everyone. It has been awhile since I've been able to get out to my blog. As you can imagine, my time has been spent taking care of Kate in a variety of forms over the past few months. In order to aid the communication of her status I went to a site called CarringBridge and created a link for Kate. From this site we will be able to do journal entries which should be a much better and timely means of keeping people updated.
Here is the link: http://www.caringbridge.org/visit/kateparkin
You will be able to select email notification so anytime we create a journal entry you will be able to get an email with that entry.
Soon I hope to get back out on this site with informative posts and even continue where we left off with that Kestrel project.
Thanks and I hope you had a great Christmas and I wish you a Happy New Year.
Jerry...
Monday, December 27, 2010
Friday, September 24, 2010
Latest News - Home Front
Hello everyone,
It has been awhile since many of you have heard from me. Things have been quite busy and hectic this year. Well, things just became much more hectic and I wanted to let everyone know what is going on.
Over the past month Kate had been in and out of the doctors, etc. As of Wednesday of this week, we finally received enough information and specifics to know what is going on. Unfortunately it's not good news.
She was diagnosed with stomach cancer (poorly differentiated signet cell adenocarcinoma). This is a difficult form of cancer that has 0% cure rate. It is currently in stage 4.
On Monday she went into the Hospital due to her kidneys being blocked so stints were put in to see if that will get them flowing again normally. I was able to bring her home yesterday (Thursday). Currently she is resting and hanging out on the coach. Still low on energy and strength. I'm watching over her pretty much all day. Monday we go in and check the kidneys to find out if they are continuing to improve or not. If not, we will be looking at another option (placing tubes in the back). This will then allow full function again.
Once the kidneys are back in proper form, she can then start Chemo treatments. If we have to go with the tubes in the back, it will be a couple weeks before we can start Chemo. Chemo is the only option at this point to give her some time. Surgery is not possible unless we see a reduction in the cancer which only Chemo will be able to do if it can. It will be about 2-3 months after the start of Chemo before we know if the treatment is having any positive impact on the cancer.
That's the latest situation as I know it today. It is my main focus right now until we can get Kate back on her feet. Sorry that I haven't been able to let you know in person or via phone.
Please don't hesitate to pass this along to other friends, family, etc. as I may not have everyone covered. I hate to cut this short, but I at least wanted to get this out while I had a moment.
Thanks, Jerry...
_____________________________
Monday, May 24, 2010
Update - Quick Status
As you may have noticed, I've been out of communication for awhile. I was tied up taking care of Kate (my wife) as she tore her rotator cuff back in Feb. and had to have surgery in April. She was in the sling for six weeks after surgery which meant she couldn't do anything. She just got out of the sling which means she can start doing Physical Therapy. It will take some months yet to get back to full speed, but she is starting to work on the mobility and strength. This means I can get back to my work and eventually get to full speed as well.
Over the next three months I will be working on a life size hawk which has to be completed by the first of September. During this time I might end up out of communication mode yet again. However, I will try and pick up where I left off on the Kestrel project along with some other topics that I started awhile back.
Until the next posting...
Competition - Harlequin Drake Decoy
This year I wasn't able to make it back east to the Ward World Championships. However, I was able to get a bird back there through the aid of a local friend/carver (Andrew Speer). Because I couldn't attend and hand carry or deliver my latest greatest pieces I decided to send a nice decoy. The one I did during the Spokane class back in January and March. This being the Harlequin Drake decoy which you can see a couple posts down on this page.
Turned out this bird competed quite well back east. It took best in species (other divers - Harlequin) in contemporary decoys. I'm pleased with this result given the fact it wasn't painted to the highest level of detail that would be needed for the CD category.
The bonus to this bird was the fact it was also entered into a show over in Havre de Grace the weekend after worlds. It had to go into the smoothie category as it was too fancy for a working decoy. In smoothie it took best in species and second best diver. Again, I couldn't be happier with this result. Under the smoothie category it wasn't painted with the highest level of detail one would expect for that category.
I consider myself fortunate to have placed at both of these shows given the fact I didn't do a bird specifically for any given category or competition. The most important thing was doing a bird I really wanted to do for myself (aside from it being a class project). Even if it happens to fall in the middle of the pack as far as detail or lack of detail didn't matter. I have a great bird for my mantle and eventually it will end up on someones mantle to enjoy for many years.
New Release - American Kestrel in Pine
 I finished this American Kestrel male this past weekend. This project was one that took place over a number of months with other projects causing it to be placed on hold numerous times. It felt really good to finish him up. It was extra special given that I was able to place the bird on a pine branch presentation.
Originally it was going to be placed on a dead stand which would have been similar to the other Kestrel presentations I've done. The owner saw the Saw-whet piece I did for worlds last year and asked if we could put him in a pine setting. This allowed me the opportunity to explore a concept I've had for sometime now with a broken topped pine tree. I have a couple trees on my property that have broken tops and viewing these trees over the years has always given me the idea of placing a bird up there. The Kestrel was a perfect carving to play with this idea.
Not only exploring the compositional elements, but also playing with new ideas for pedestals. This one used a piece of Butternut with a natural stain to show off the grain of the wood while the color of the wood would work well with the sculpture. Also, I wanted a wood that would tie in well with the Kestrels color a bit more. That turned out to be Cherry wood. I also liked the idea of placing a black spacer in-between the wood blocks to add a touch of class to the piece, yet not overpower it.
One thing I found with these tall presentation sculptures is the need for a solid base. If the base is too narrow it is easily knocked over. I have always loaded the pedestal with lead, but it would still have a sense of instability if bumped just right. So, with this pedestal presentation I widened the base with each layer of wood in addition to the lead weighting. The combination was perfect as this piece has no sense of instability at all. I will be using this design again for other tall sculpture presentations.
To see additional photos of this bird please visit my New Release page on my website http://www.simchuk.com/19601.html
Thursday, April 15, 2010
New Release - Harlequin Drake Decoy
 As promised, I finally have a chance to post my latest Harlequin Drake Decoy. This is the bird I did in the class I taught in Spokane on both the carving and painting back in January and early March.
I really enjoyed doing this class as it is one of my favorite waterfowl. I'm lucky enough to be in an area where I get to see this bird in the spring while they are inland during the breading season. Up in Glacier National Park we can see them swimming around the glacial waters while they are feeding.
This bird is functional and is ready to hunt over or more likely go in the tank for competition purposes.
To see more photos of this bird go to my New Release page on my website http://www.simchuk.com/19601.html
New Release - Study Casts
 Earlier this week (April 12) I picked up my first batch of study casts for my latest bird carving. That would be the Eastern Blue Jay. This was a great bird to carve and turn into a study cast.
I have spent a number of winters now watching this guy out my kitchen window during the winter months all puffed up and in this restful posture. I finally had a chance to create this bird in wood. Of course, it didn't hurt being pushed to come up with a study cast of the Blue Jay. KV Woodcarving Supply is keeping me on my toes with requests for new casts and books.
This study cast is of a life size Eastern Blue Jay. I am selling these for $40.00 plus shipping & handling. You can also pick one up from any of the retailers I work with. You can get this list from the links page on my website http://www.simchuk.com/24401.html.
 A week after I sent the Blue Jay in for molding and casting, I was able to finish a Screech Owl carving. Of course, this bird was well on it's way to being completed before I started working on the Jay.
I was able to get a few study casts of this Screech Owl at the same time I picked up the Blue Jays. Next week I will get the remainder of my initial order.
This is a life size Screech Owl study cast. I based it on a Western, however it can be used as an Eastern as well. I am selling this cast for $47.50 plus shipping & handling.
I plan to have instructional books available to compliment both of these casts in the future. The Screech owl book will be available around October time frame while the Jay will be early next year.
To see the other study casts and books I have available please go to my carving & art products page on my website http://www.simchuk.com/24546.html.
Thursday, March 11, 2010
In the Studio
For those who have been following my blog you might have noticed I've been in quite mode for the last couple weeks. There is a good reason for the quite mode. Actually, a number of good reasons.
First, I was out for a week teaching a painting class in Spokane, WA where we painted a Harlequin Drake decoy. This class was a follow up to the carving which was done back in January. I have to say, March was a much nicer time of year to travel and work on this project over in Spokane. This was such a fun class and fun bird to paint. The more of these birds I carve the more I enjoy and appreciate there beauty. The initial plan was to make this a basic/traditional hunting decoy. Well, when I got to the painting stage, it ended up falling outside the traditional painting style since I just wanted to keep adding more detail and flare to the piece. As was the case with the example bird. With this bird I just couldn't help but put in the little extra flare and realistic feathering. By the time I was done it was clear that it was a little better looking bird than the example bird I did before the class in January. This isn't anything new, since I find each time a do a piece it's a little better than the last. Even if I do the same bird back to back. Part of the reason for this is that I'm always looking for ways to improve a piece. I'll post a photo of the finished bird within the next week so you can see it.
The other thing consuming my time when I am back in the studio, I'm work on another project (besides the Kestrel). This project is the subject for my next study cast and book, the Screech Owl. I have a customer who wants a Western Screech Owl, plus I will be teaching a class on this bird later this year (Oct - Nov). Right now I have him roughed out with feather groups all in place. A couple more days and I should be into the texturing. For those interested in the Eastern Screech, not to worry. I will work on the Red phase painting as a supplement to the Western. You will be able to use the Westerns coloration for the Gray phase Eastern. I'm hoping to have the life size study cast available by the first of May.
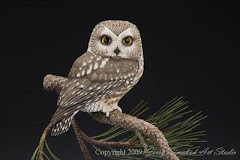
Just when you thought that was enough going on, I also have an art show that I'm getting ready for. The 5 day Western Heritage Art Show over in Great Falls, MT. This is one of my bigger shows for the year so it's taking a bit of my attention to assure I'm ready for a good show. The show begins Wednesday the 17th. I always look forward to this show as I get to compete with other artists and art mediums with a single piece that is placed in the main lobby area. Last year I was fortunate enough to not only win best carving, but also best of show. I will be hoping for a repeat performance this year as I will take my World piece (Saw-whet Owl), and see how he stacks up against all the other artists in the show along with there various art mediums. I say, hope since there is no way to know what will happen in an apples - oranges judging situation. No matter what it will still be fun and it will be my main piece to show in the lobby this year. As they say, any given day, judge, situation, anything can happen.
Until the next posting, I best be getting back to the few things on my plate.
First, I was out for a week teaching a painting class in Spokane, WA where we painted a Harlequin Drake decoy. This class was a follow up to the carving which was done back in January. I have to say, March was a much nicer time of year to travel and work on this project over in Spokane. This was such a fun class and fun bird to paint. The more of these birds I carve the more I enjoy and appreciate there beauty. The initial plan was to make this a basic/traditional hunting decoy. Well, when I got to the painting stage, it ended up falling outside the traditional painting style since I just wanted to keep adding more detail and flare to the piece. As was the case with the example bird. With this bird I just couldn't help but put in the little extra flare and realistic feathering. By the time I was done it was clear that it was a little better looking bird than the example bird I did before the class in January. This isn't anything new, since I find each time a do a piece it's a little better than the last. Even if I do the same bird back to back. Part of the reason for this is that I'm always looking for ways to improve a piece. I'll post a photo of the finished bird within the next week so you can see it.
The other thing consuming my time when I am back in the studio, I'm work on another project (besides the Kestrel). This project is the subject for my next study cast and book, the Screech Owl. I have a customer who wants a Western Screech Owl, plus I will be teaching a class on this bird later this year (Oct - Nov). Right now I have him roughed out with feather groups all in place. A couple more days and I should be into the texturing. For those interested in the Eastern Screech, not to worry. I will work on the Red phase painting as a supplement to the Western. You will be able to use the Westerns coloration for the Gray phase Eastern. I'm hoping to have the life size study cast available by the first of May.
Just when you thought that was enough going on, I also have an art show that I'm getting ready for. The 5 day Western Heritage Art Show over in Great Falls, MT. This is one of my bigger shows for the year so it's taking a bit of my attention to assure I'm ready for a good show. The show begins Wednesday the 17th. I always look forward to this show as I get to compete with other artists and art mediums with a single piece that is placed in the main lobby area. Last year I was fortunate enough to not only win best carving, but also best of show. I will be hoping for a repeat performance this year as I will take my World piece (Saw-whet Owl), and see how he stacks up against all the other artists in the show along with there various art mediums. I say, hope since there is no way to know what will happen in an apples - oranges judging situation. No matter what it will still be fun and it will be my main piece to show in the lobby this year. As they say, any given day, judge, situation, anything can happen.
Until the next posting, I best be getting back to the few things on my plate.
Saturday, February 20, 2010
Bird Patterns
I recently received an E-mail from a beginning carver who wanted to know where he can find bird patterns so he can place them on a piece of wood. Also so he can get the size right for the bird.
This was a great question that isn't an easy one to answer. It may require a number of posts over time to cover the vastness of this question.
The first question I needed answered was, "What type of birds do you want to carve?".
Depending on what type of bird, there could be a lot of patterns available or none at all. Waterfowl for example, there are a wide range of locations to find good patterns: Pat Godin series of patterns, Keith Mueller (if you can find his book anymore), and so on. But, if you want to carve a rare songbird, then good luck, there may not be one around.
He did indicate that he recently subscribed to Wildfowl Carving Magazine. This magazine will have at least one pattern in each issue. Over time, you might see the pattern you want. Or, you could back-order an issue with the bird you are looking for. Speaking of Wildfowl Carving Magazine, some years ago I remember picking up a set of there Reference Guide books. Each book contain information on at least 5-7 birds along with a pattern to go with it. These books were grouped based on bird type (waterfowl, songbird, raptor, etc.).
My second question to him was "Where do you live?". If a person happens to live near a carving supply shop, then you simply go in and thumb through reference material until you find what you need. However, most people live some distance from a supplier so all we can do is look on-line and hope that the content is worth the money we will spend on a given book or pattern. Or, we attend a carving show that has a supplier or two on hand. This is most likely what most of us do.
In future postings on this topic I will discuss the pros & con's of using other peoples pattern, plus making your own pattern. I just finished making a pattern for a Western Screech Owl this week. Aside from taking a few days to make, you might be interested to know what I found when comparing other carvers patterns to each other.
If you have any additional side points on the topic of patterns feel free to let me know so I can include it with future postings.
Current Work in Progress - Kestrel - 5th Posting
 In this weeks progress posting I am showing how I handle the soft feather groups. Soft feathers don't require individual feathers to be cut in place as was the case with the wing and tail feathers, rather I cut in groups of soft feathers.
The steps in creating soft feathers:
1. Draw in the feather groups. Use an S shape when creating these groups. Going from small groups around the head, to larger as you reach the flanks. Each group represents a group of soft feathers. I try to follow the natural feather flow in all areas when creating these groups.
2. Cut the feather groups. I use a diamond flame to cut these in (football shape). I try to vary the depth of these cuts to create variation of depth across the soft feather area. Deeper down the center and back portion of the birds body.
3. Round over the edges. Using the carbide flame cutter, I roll the edges so there are not sharp or steep drop offs from one group to the next.
4. Refine groups. At this point I will go in and make some valleys deeper or shallower to create a nice flow and variation from group to group over a given area.
On the breast, belly, flanks and under tail coverts I will cover the entire area with these soft feather groups. On the scapulars, forward wing coverts, cape, and nape I will only do partial groups to give an impression of feather groupings. Basically I don't want to have these areas too lumpy - bumpy.Saturday, February 6, 2010
Current Work in Progress - Kestrel - 4th Posting
 In this weeks progress posting I will review the feather layout for the wings and tail. In this first image you see I have drawn in place the feathers that make up the wings and tail.
Also you will notice that I have drawn in feather groupings for the Scapulars, Cape, and forward wing coverts. These feather groups are considered soft feathers and the individual feathers won't be separated out as in the other wing and tail feathers.
 This next photo shows all the main wing feathers cut into place. At present they look stacked in place due to the abrupt edge. At this time too, I went ahead and did some undercutting of the primaries. Still leaving them plenty thick for strength as I continue to work the bird.
Also take note of the soft feather groups. they were cut in and given a soft rolling in and out of each valley. The next posting will review how this is accomplished.

In this photo notice how I softened the edges of the individual feathers. This makes it more realistic and gradual step down from one feather to the next. The only feathers with a much more abrupt edge are the primaries, tail feathers, and any area I want to show lift and separation.
You might notice I went ahead and created the major feather splits or separation around the head and cheek patch. Later postings you will get to see a closer view of this work.
Sunday, January 31, 2010
Current Work in Progress - Kestrel - 3rd Posting
 It has been a little time since I was able to post the progress of the Kestrel. I'm now back and we will continue showing progress steps for this bird.
Since the last progress posting I was able to refine both the head and body shape. No more square parts to the bird.
As for the head, the things that took place: Lock in the shape and form of the bill, establish the cheek patch, get the throat defined and basic rounding and shaping of the overall head.
As for the body, the cape, scapulars, wings, breast, belly, tail, and primaries were all sized and shaped.
Now what you see starting to take place is the initial layout of the major wing feather groups. Right now it looks like stair steps from one group to the next. All stepping down as you work from the front of the wing to the back of the wing (primaries).
New Release

After completing the Mallard Drake Club Head I decided to get this Canada Goose Club Head completed as well. This was the head given to me by a fellow carver who challenged me to do a club head. He wanted to see what I could do with it and finally here we are.
This head was a fun project since I was able to work on a goose in decoy style rather than a duck. Granted both ducks and geese are pretty similar in carving and painting techniques, there are however differences with the bills and added length to the neck.
To see more of this piece go to my website: http://www.simchuk.com/19601.html
New Release
 After getting back from the Harlequin decoy class in Spokane I was pretty whipped out and wasn't quite ready to get back into the Kestrel project I have in the works. As a result, I decided to do this little guy to ease my way back into the larger Kestrel project.
This Mallard Drake Club Head is a fun project and I was able to stay in the decoy mode that I was in while working on the Harlequin Drake project.
To see more pictures of this little guy check out my website: http://www.simchuk.com/19601.html
New Release
 In January I created this Harlequin Drake Decoy so there would be an example for my class in Spokane to see what they would create. This class would carve a functional Harlequin Drake working decoy.
The intent was to have a working decoy style which would be very basic and simple in both carving and painting.
As I proceeded through the carving I decided to provide more definition in the bill and wings which kicked it out of a typical working decoy classification. A traditional working decoy would have no bill detail and the primaries would not be a refined as I have them here.
Also, when I moved into the painting of this bird, I decided to try to give it more interest and pop. This was accomplished through more feathering and blending of colors than one would see on a traditional working decoy where the colors are blocked in.
As a result I have a very attractive looking decoy that I'm quite pleased with.
You can see more photos of this bird on my website: http://www.simchuk.com/19601.html
Tuesday, January 12, 2010
Current Work In Progress - Kestrel - 2nd Posting
 The initial day consists of truing up the cutout so it more closely aligns with the pattern. I will also begin shaping the birds body and head.
From this photo you can see I'm already starting to round the body (back and wings). Also at this point I have only removed some of the wood above the eyes on the head and identified the location of the cheek patch.
With this initial roughing work I will be able to see if the bird will turn out the way I want for the finished presentation. And, in this case he is coming together as I had envisioned.
Subscribe to:
Posts (Atom)