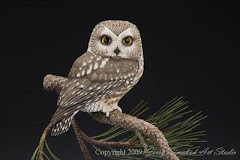
I recently received an E-mail from a beginning carver who wanted to know where he can find bird patterns so he can place them on a piece of wood. Also so he can get the size right for the bird.
This was a great question that isn't an easy one to answer. It may require a number of posts over time to cover the vastness of this question.
The first question I needed answered was, "What type of birds do you want to carve?".
Depending on what type of bird, there could be a lot of patterns available or none at all. Waterfowl for example, there are a wide range of locations to find good patterns: Pat Godin series of patterns, Keith Mueller (if you can find his book anymore), and so on. But, if you want to carve a rare songbird, then good luck, there may not be one around.
He did indicate that he recently subscribed to Wildfowl Carving Magazine. This magazine will have at least one pattern in each issue. Over time, you might see the pattern you want. Or, you could back-order an issue with the bird you are looking for. Speaking of Wildfowl Carving Magazine, some years ago I remember picking up a set of there Reference Guide books. Each book contain information on at least 5-7 birds along with a pattern to go with it. These books were grouped based on bird type (waterfowl, songbird, raptor, etc.).
My second question to him was "Where do you live?". If a person happens to live near a carving supply shop, then you simply go in and thumb through reference material until you find what you need. However, most people live some distance from a supplier so all we can do is look on-line and hope that the content is worth the money we will spend on a given book or pattern. Or, we attend a carving show that has a supplier or two on hand. This is most likely what most of us do.
In future postings on this topic I will discuss the pros & con's of using other peoples pattern, plus making your own pattern. I just finished making a pattern for a Western Screech Owl this week. Aside from taking a few days to make, you might be interested to know what I found when comparing other carvers patterns to each other.
If you have any additional side points on the topic of patterns feel free to let me know so I can include it with future postings.
Saturday, February 20, 2010

Current Work in Progress - Kestrel - 5th Posting
 In this weeks progress posting I am showing how I handle the soft feather groups. Soft feathers don't require individual feathers to be cut in place as was the case with the wing and tail feathers, rather I cut in groups of soft feathers.
The steps in creating soft feathers:
1. Draw in the feather groups. Use an S shape when creating these groups. Going from small groups around the head, to larger as you reach the flanks. Each group represents a group of soft feathers. I try to follow the natural feather flow in all areas when creating these groups.
2. Cut the feather groups. I use a diamond flame to cut these in (football shape). I try to vary the depth of these cuts to create variation of depth across the soft feather area. Deeper down the center and back portion of the birds body.
3. Round over the edges. Using the carbide flame cutter, I roll the edges so there are not sharp or steep drop offs from one group to the next.
4. Refine groups. At this point I will go in and make some valleys deeper or shallower to create a nice flow and variation from group to group over a given area.
On the breast, belly, flanks and under tail coverts I will cover the entire area with these soft feather groups. On the scapulars, forward wing coverts, cape, and nape I will only do partial groups to give an impression of feather groupings. Basically I don't want to have these areas too lumpy - bumpy.Saturday, February 6, 2010
Current Work in Progress - Kestrel - 4th Posting
 In this weeks progress posting I will review the feather layout for the wings and tail. In this first image you see I have drawn in place the feathers that make up the wings and tail.
Also you will notice that I have drawn in feather groupings for the Scapulars, Cape, and forward wing coverts. These feather groups are considered soft feathers and the individual feathers won't be separated out as in the other wing and tail feathers.
 This next photo shows all the main wing feathers cut into place. At present they look stacked in place due to the abrupt edge. At this time too, I went ahead and did some undercutting of the primaries. Still leaving them plenty thick for strength as I continue to work the bird.
Also take note of the soft feather groups. they were cut in and given a soft rolling in and out of each valley. The next posting will review how this is accomplished.

In this photo notice how I softened the edges of the individual feathers. This makes it more realistic and gradual step down from one feather to the next. The only feathers with a much more abrupt edge are the primaries, tail feathers, and any area I want to show lift and separation.
You might notice I went ahead and created the major feather splits or separation around the head and cheek patch. Later postings you will get to see a closer view of this work.
Sunday, January 31, 2010
Current Work in Progress - Kestrel - 3rd Posting
 It has been a little time since I was able to post the progress of the Kestrel. I'm now back and we will continue showing progress steps for this bird.
Since the last progress posting I was able to refine both the head and body shape. No more square parts to the bird.
As for the head, the things that took place: Lock in the shape and form of the bill, establish the cheek patch, get the throat defined and basic rounding and shaping of the overall head.
As for the body, the cape, scapulars, wings, breast, belly, tail, and primaries were all sized and shaped.
Now what you see starting to take place is the initial layout of the major wing feather groups. Right now it looks like stair steps from one group to the next. All stepping down as you work from the front of the wing to the back of the wing (primaries).
New Release

After completing the Mallard Drake Club Head I decided to get this Canada Goose Club Head completed as well. This was the head given to me by a fellow carver who challenged me to do a club head. He wanted to see what I could do with it and finally here we are.
This head was a fun project since I was able to work on a goose in decoy style rather than a duck. Granted both ducks and geese are pretty similar in carving and painting techniques, there are however differences with the bills and added length to the neck.
To see more of this piece go to my website: http://www.simchuk.com/19601.html
New Release
 After getting back from the Harlequin decoy class in Spokane I was pretty whipped out and wasn't quite ready to get back into the Kestrel project I have in the works. As a result, I decided to do this little guy to ease my way back into the larger Kestrel project.
This Mallard Drake Club Head is a fun project and I was able to stay in the decoy mode that I was in while working on the Harlequin Drake project.
To see more pictures of this little guy check out my website: http://www.simchuk.com/19601.html
New Release
 In January I created this Harlequin Drake Decoy so there would be an example for my class in Spokane to see what they would create. This class would carve a functional Harlequin Drake working decoy.
The intent was to have a working decoy style which would be very basic and simple in both carving and painting.
As I proceeded through the carving I decided to provide more definition in the bill and wings which kicked it out of a typical working decoy classification. A traditional working decoy would have no bill detail and the primaries would not be a refined as I have them here.
Also, when I moved into the painting of this bird, I decided to try to give it more interest and pop. This was accomplished through more feathering and blending of colors than one would see on a traditional working decoy where the colors are blocked in.
As a result I have a very attractive looking decoy that I'm quite pleased with.
You can see more photos of this bird on my website: http://www.simchuk.com/19601.html
Subscribe to:
Posts (Atom)